Before going through this blog please checkout blog on Cucumber Fundamentals
Cucumber is testing tool which implements BDD(behaviour driven development).It offers a way to write tests that anybody can understand, regardless of there technical knowledge.
It users Gherkin (business readable language) which helps to describe behaviour without going into details of implementation
It's helpful for business stakeholders who can't easily read code (
Why cucumber tool, is called cucumber , I have no idea if you ask me I could have named it "Potato"(goes well with everything and easy to understand 😂)
Well, According to its founder.....
My wife suggested I call it Cucumber (for no particular reason), so that's how it got its name. I also decided to give the Given-When-Then syntax a name, to separate it from the tool. That's why it's called Gherkin (small variety of a cucumber that's been pickled. It's a little cucumber that's been pickled in a brine, vinegar, or other solution and left to ferment for a period of time.)
We have 3 files created under the framework.
1. Feature file-It contains high level description of the test scenario in Gherkin language(Plain English text) once this is run it generated a code which can be copied to step definition file
It consist of --
Feature-details of current test script which is to be execute
Scenario- expected out come test script
Scenario Outline- In order to achieve data drive approach we use scenario outline
Note- Either you used scenario or scenario outline(can't be used together)
Keywords---Given, When Then, And (You can also use * instead of keywords)
2. Step definition file- It maps the test case steps in the feature files to code
3. Runner class- Cucumber uses Junit class will have Junit annotation@RunWith and @CucumberOptions used for exciting the test cases by accessing you feature file and step definition file
4. Dependencies Required- There are few depedencies required in oder to run cucumber, as there are depdencies mentioned in maven repository Don't use them when tagged with io.cucumber here it doesn't work info.cukes is a safe option
Let's start with implementation on you fav shopping website Amazon.
I have created 3 packages for feature file, step definiton file and Runner class
Create feature file always with .feature extension
Once this is done you can create class test runner and step definition under respective package
Next step is to define our feature file with scenarios You can used either "Scenario" or "Scenario outline " (for parameterisation)
An example of scenario
Feature: To test login feature file
Scenario: Amazon Login
Given user launching Chrome browser
Given user navigates to application
When user enters username as "priyanka@gmail.com"
When user clicks on continue
When user enters password as "<India@123>"
When user clicks on Login
Then user verify login success status
And user close browser
For achieving data drive approach we use "Scenario Outline" with keyword "Examples"
Scenario Outline:
Given user launching Chrome browser
Given user navigates to application
When user enters username as "<username>"
When user clicks on continue
When user enters password as "<password>"
When user clicks on Login
Then user verify login success status
And user close browser
Examples:
| username | password |
| johns@outlook.com | mercury25 |
| priyanka@gmail.com | India@123 |
To comment something on feature file you need to use # as shown in below screenshot

t
In the above code John is a fake login and Priyanka is a genuine login
so the code will try to enter John username and password and give error
while with second login and password it will launch the Amazon cart page
Once this is done you can run the feature file in order to generate code for stepdefintion class
This code will be generated for all you scenarios in console copy and paste generated code in your step definition file and start writing you own test scripts
An example of code generated once feature file is run
Generated step definition file after adding the code for amazon login
package Stepdefinition;
//A step definition is the actual code implementation of the feature mentioned in the feature file.
import java.util.concurrent.TimeUnit;
import org.openqa.selenium.By;
import org.openqa.selenium.JavascriptExecutor;
import org.openqa.selenium.WebDriver;
import org.openqa.selenium.WebElement;
import org.openqa.selenium.chrome.ChromeDriver;
import org.openqa.selenium.firefox.FirefoxDriver;
import org.testng.Assert;
import cucumber.api.PendingException;
import cucumber.api.java.en.Given;
import cucumber.api.java.en.Then;
import cucumber.api.java.en.When;
public class Stepdef {
WebDriver driver;
//here we are itializing the chrome browser
@Given("^user launching Chrome browser$")
public void user_launching_Chrome_browser() throws Throwable {
System.out.println("Launching chrome Browser");
System.setProperty("Webdriver.chrome.driver", "chromedriver");
driver = new ChromeDriver();
}
// fetching the Amazon link
@Given("^user navigates to application$")
public void user_navigates_to_application() throws Throwable {
driver.get(""https://www.amazon.in/ap/signin?")
}
@When("^user enters username as \"([^\"]*)\"$")
public void user_enters_username_as(String username) throws Throwable {
System.out.println("enters username"+ " "+ username );//username is picked from the feature file
driver.findElement(By.xpath("//input[@name='email']")).sendKeys(username);
//Javascript executor is used in order confirm that it click the web element
}
@When("^user clicks on continue$")
public void user_clicks_on_continue() throws Throwable {
WebElement bt1 = driver.findElement(By.xpath("//input[@id='continue']"));
JavascriptExecutor js = (JavascriptExecutor)driver;
js.executeScript("arguments[0].click();", bt1);
}
@When("^user enters password as \"([^\"]*)\"$")
public void user_enters_password_as(String password) throws Throwable {
System.out.println("enters password");
driver.findElement(By.xpath("//input[@name='password']")).sendKeys(password);//picked from the feature file
driver.manage().timeouts().implicitlyWait(10, TimeUnit.SECONDS);
}
@When("^user clicks on Login$")
public void user_clicks_on_Login() throws Throwable {
WebElement bt2= driver.findElement(By.xpath("//input[@id='signInSubmit']"));
JavascriptExecutor js = (JavascriptExecutor)driver;
js.executeScript("arguments[0].click();", bt2);
driver.manage().timeouts().implicitlyWait(10, TimeUnit.SECONDS);
}
//Here we are trying to fetch the title after successful login if after login title which is "Amazon.in Shopping Cart" is is matching with the expected output then we can say "user on correct webpage" if it has different title then it will print "user on the wrong webpage"
@Then("^user verify login success status$")
public void user_verify_login_success_status() throws Throwable {
driver.manage().timeouts().implicitlyWait(20, TimeUnit.SECONDS);
String title= driver.getTitle();
System.out.println(title);
if(title.contentEquals("Amazon.in Shopping Cart")) {
System.out.println("User on the corrrect web page");
}
else{
System.out.println("User on wrong webpage");
}
}
@Then("^user close browser$")
public void user_close_browser() throws Throwable {
driver.quit();
}
}
Once you are done with the stepdefinition
then go to runner class and copy and paste the code
import cucumber.api.junit.Cucumber;
import org.junit.runner.RunWith;
import cucumber.api.CucumberOptions;
import cucumber.api.junit.Cucumber;
@RunWith(Cucumber.class)
@CucumberOptions(
features="mention path of your feature file",
glue={"Stepdefinition"})
public class Testrunner {
}
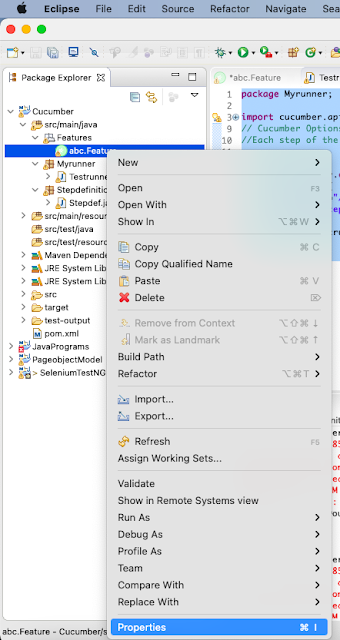
To find out path of "feature file" right click on feature go to properties and copy the path
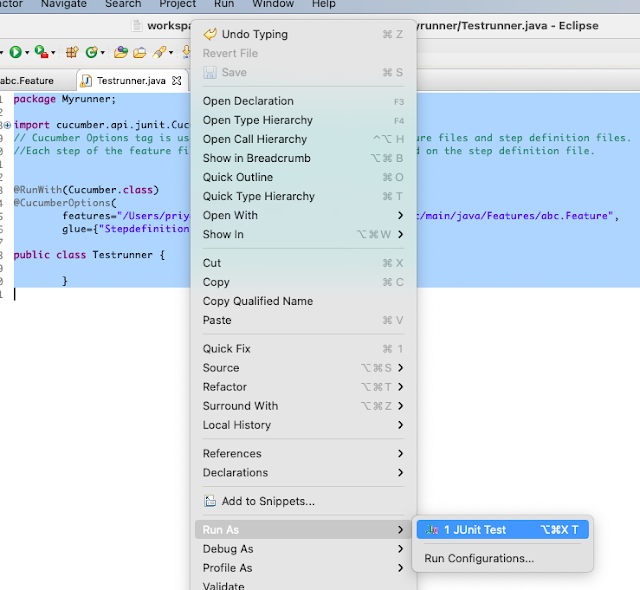
Once this is done You can run the runner class by right clicking and running it as Junit testAs per the code we have picked John as a fake user and priyanka as genuine user so the result should be
in first case "user in wrong webpage" and in later case "user on the correct webpage"
You can also check the execution
here
Reporting
Now you can check the reporting part:-
you just need to add format under @CucumberOptions in runner class
format={"pretty","html:test-output","json:json_output/cucumber.json","junit:junit/junit_xml/cucumber.xml"})
"html:test-output" will create a folder test-ouput and result of your run
"json:json_output/cucumber.json"- create folder json_output and file cucumber.json
"junit:junit/junit_xml/cucumber.xml"create folder Junit under which junit_xml for result
Code would be like
@RunWith(Cucumber.class)
@CucumberOptions(
features="/Users/priyankac/Documents/workspace/Testproj/src/main/java/Features/abc.Feature",
glue={"Stepdefinition"}, format={"pretty","html:test-output","json:json_output/cucumber.json","junit:junit/junit_xml/cucumber.xml"})
public class Testrunner {
}
Run the test runner class again
then go to the project and click on "refresh"
All 3 folder will be created
Open Json_output and click on file it will give you detailed result for your test run
In index.html format report you click on "test-output" folder go to "index.xml" right click ->copy the path and paste it in the browser
The execution report will look like this
Thank you


Wonderful blog. Thanks for sharing a useful information....
ReplyDeleteGoogle Ads Training Courses In Chennai
Google Adwords Online Course
This post is so interactive and informative.keep update more information...
ReplyDeleteTally Course in Velachery
Tally course in Chennai
This post is so interactive and informative.keep update more information...
ReplyDeleteAngularjs Training in Tambaram
Angularjs Training in Chennai
kralbet
ReplyDeletebetpark
tipobet
slot siteleri
kibris bahis siteleri
poker siteleri
bonus veren siteler
mobil ödeme bahis
betmatik
433
شركة تنظيف مجالس بالدمام haWxwB8xEM
ReplyDeleteشركة مكافحة النمل الابيض بالجبيل jszIx1Rvky
ReplyDelete